Showing posts with label wood. Show all posts

Monday, December 05, 2011

Handmade Birthday Calendar


So this past weekend we had our gift exchange with my side of the family.  The adults did a Chinese gift exchange as usual, and the theme was handmade/secondhand/re gifted... and I had so much fun coming up with and making my handmade gift! I decided to make the perpetual birthday calender I saw on Pintrest (link here) Here's my completed project:


Obviously the person receiving the gift would want to choose whose birthday to remember, so I just made 'people' for the grandkids since they'd go on everyone's calendar anyways.

To make the people, I picked up some game pawns from Windor Plywood. A lot of game pawns. My sister married into a huge family, and I wanted to make sure this gift could work for everyone. Unfortunately they were already painted, which made repainting them a bit more work since I had to do multiple coats.
 I started with painting all the heads flesh coloured. I then added the hair and features (half of the pawns are girls, and half boys, and I did half blonde and the others brown haired) The bodies were then painted red and blue. I drilled small holes in all the heads, and added small hooks (all facing left - I'll tell you why later ;)
I added the hooks at this point to make it easier to coat them in polyurethane. Instead of painting them each individually, I dipped them in the can, then hung them to dry. Don't they look cute all hanging there? They ended up with a dried poly 'drip' on the bottom of each pawn, but since I'd be drilling another hole in the bottom anyways, I didn't worry about this so much.
Once all the pawns were painted, hooked and polyed, I drilled another small hole in the bottom of each pawn and added a small eye, which was set perpendicular to the hook.  And why did I do this? So that when the pawns were hanging they'd all face out! (see, I DO think ahead once and awhile!)
 And here's all sixty pawns all ready to be named:

I picked up a ready made plaque (yes, I cheated a little) and painted it in a kind of neutrally-wood-grain colour (so it would work with all decors) To make painting easier, I stuck four push-pins in the back side.
Using my brand-new Cricut (!!!) I cut out the text and the decals in black vinyl, applied them to the plaque, and polyurethaned it.


Some more drilling and adding of hooks and the whole thing is DONE! I'm thinking I have to make one for myself now :)


And because I'm such a dork, I also made a custom box for the whole shebang so it would look all pretty when unwrapped:


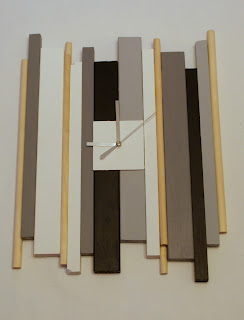
Is anyone wondering what the hubby made for this gift exchange? Sorry, I'm gonna show you anyways:
His minimalist, modern clock. TA DA!

Thursday, November 17, 2011

Peg dolls

After seeing Simple Simon & Co 's post showing off the peg dolls made for her son I fell in LOVE! Not that I particularly love Star Wars or Harry Potter, but I thought these little hand painted dolls were the cutest thing EVER!  And since my nephew is developing an obsession with Star Wars, I thought I'd throw some together to go with the Christmas gifts.  Some for the never-watched-the-movies Star Wars obsessed nephew, some for the almost-3-year-old niece, and some for Ashton, who caught me making them:


Aren't they fun? Here's the princesses: Ariel, Aurora, Belle, Snow White and Cinderella. Not sure how well she knows the characters, but she's already started a collection of Calico Critters (aka MapleTown - remember them?) so I didn't really want to do a dollhouse family.


Here's the Star Wars guys: Stormtrooper, Yoda, C3PO, R2D2, Darth Vadar, Luke, Han Solo and Princess Leia (I've never actually watched the movies start to finish, but I think these are the 'main' characters, right?)


And Ashton's: a knight, cowboy, superhero, pirate, Robin Hood and construction worker.  I did these while he was in bed, and wrapped them pretty cleverly I think, but he's still saying 'Oh! These are my superhero guys!'  The kid knows exactly what he's getting for Christmas.  Not sure if that's good or bad...


All of them are painted with acrylic paint (not the faces) and coated with polyurethane for durability. Aren't they CUUUUTE?!?!

Friday, August 05, 2011

DIY decor using shims.

So my basement is slooooowly getting done.  DH is having problems convincing buddies to come and help install the floor - it's 2/3 of the way there.  As soon as that's done, we can start setting up since there's just trim and doors and bathroom stuff and closet stuff...okay there's a lot of stuff left after the floor, but you get the point.  I've seen some pretty cool stuff here in 'net land to decorate the basement with.  My Pintrest basement board is chock full of all sorts of DIY goodies.  Here's one I absolutely swooned over!

Perfect by a little reading corner!  So my little brain got to work: How can I make this without 1. going to buy lumber and transporting it home on top of the car seats and 2. Cut the lumber without wading over top of DH's mess in the garage.  The answer came as I was organizing the complete disaster downstairs: SHIMS!  (y'know, those little wedges used to make the jam level when installing a door - I think they're usually made of ceder)  There were two lovely packs sitting there waiting and waiting to be used, so I thought, why make them wait any longer?  So I went and grabbed the prettiest ones (some are a little cracked or knotty)  As stated before, although I can use power tools, I didn't feel like wading through the mess, so to create the points for the arrows I used a utility knife.  Just made a few cuts and voila beautifully pointy shims!  To 'antiquify' the wood I let some steel wool sit in white vinegar for a few hours, then brushed the mixture on the wood.  (wherever the bits of steel wool hit the wood, there ended up being little rusty speckles.  And I also antiqued my ugly laminate counter top in the process - reason #52 for a new kitchen...)


I had envisioned doing each sign in some lovely font which went with the story, but that never occurred.  Just painted some block letters on with black acrylic and outlined with white.


I chose locations in stories which I had read as a child (okay, who am I kidding, that I still read now) Mounted on a scrap piece of wood (also 'antiqued') with wood glue, I think it looks pretty good!

I also saw this sign from artsy fartsy mama that I thought would 'match' pretty well

So here's my version:

Shims lined up, one glued across the back holding it all together.  I decided not to 'antique' this one.  And how did I get the font?  Well I'm glad you asked!  After brainstorming quite a bit I thought of this really easy way to transfer images to a non-smooth surface.  All I did was print the text (backwards!) on a transparency.  With an ink jet printer the ink does not dry (make sure you're not using an 'inkjet transparency')  Flip the transparency ink side down, place on wood (no wiggling, you'll smudge it) and rub.  The ink should transfer so that you can go  over it with the paint colour of your choice!  Done and done.

My hubby's comment when he saw my 'creations' "How do you expect me to hang the doors if you keep using all the shims?"  Ha ha.


UPDATE: YES, I MISSPELLED ROALD DAHL'S NAME. IT'S FIXED NOW...OOPS!