Showing posts with label decor. Show all posts

Sunday, January 15, 2012

Olivia's First Birthday Party

So my baby girl turned ONE the first week of January.  A birthday party was in order.  The theme was obvious.

OLIVIA THE PIG

My lovely sister hosted the party and let me take over the house with the decorations


I had some fun drawing a 'life sized' Olivia to put up:


and also sculpted an Olivia to go on the cake:


The girls got a lovely Olivia themed boa and tiara, and since I couldn't think of anything 'Oliviaish' to get the boys, they got a red slinky.


Madam started out in her pretty birthday dress


but was stripped down to the diaper to enjoy her cake


I think she enjoyed it.  Later that week I did a 'cake smash' shoot with her, which she also thoroughly enjoyed:


Makes me somewhat sad that my baby girl is growing up so fast, but we're enjoying every minute!

Monday, December 05, 2011

Handmade Birthday Calendar


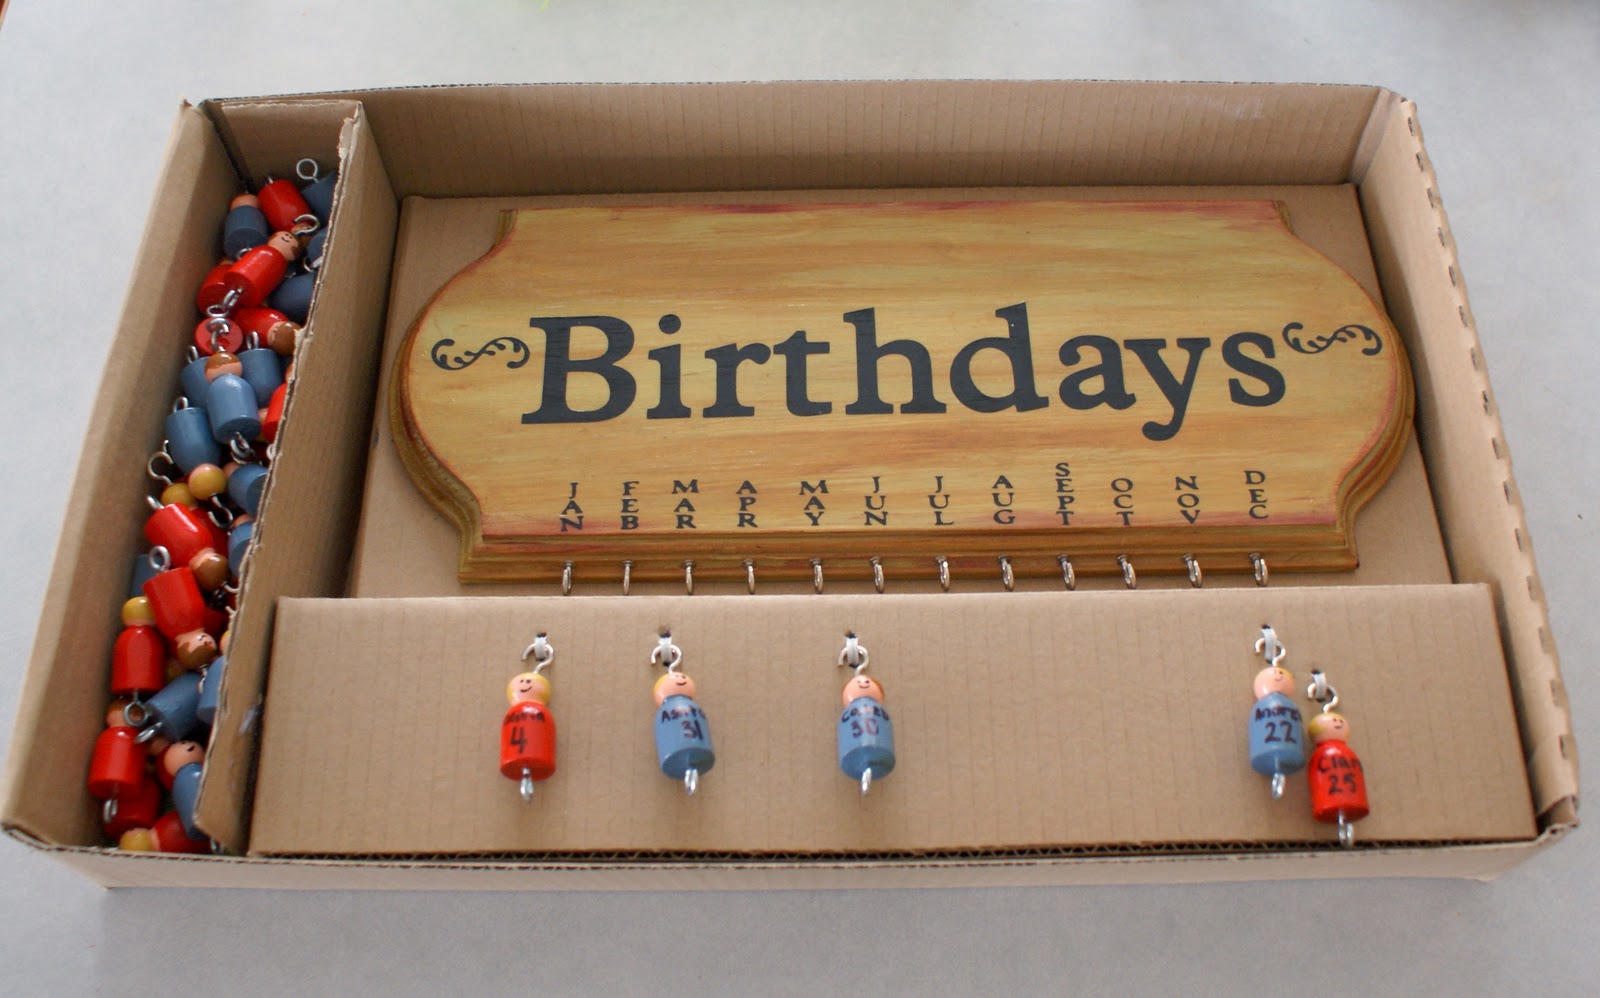
So this past weekend we had our gift exchange with my side of the family.  The adults did a Chinese gift exchange as usual, and the theme was handmade/secondhand/re gifted... and I had so much fun coming up with and making my handmade gift! I decided to make the perpetual birthday calender I saw on Pintrest (link here) Here's my completed project:


Obviously the person receiving the gift would want to choose whose birthday to remember, so I just made 'people' for the grandkids since they'd go on everyone's calendar anyways.

To make the people, I picked up some game pawns from Windor Plywood. A lot of game pawns. My sister married into a huge family, and I wanted to make sure this gift could work for everyone. Unfortunately they were already painted, which made repainting them a bit more work since I had to do multiple coats.
 I started with painting all the heads flesh coloured. I then added the hair and features (half of the pawns are girls, and half boys, and I did half blonde and the others brown haired) The bodies were then painted red and blue. I drilled small holes in all the heads, and added small hooks (all facing left - I'll tell you why later ;)
I added the hooks at this point to make it easier to coat them in polyurethane. Instead of painting them each individually, I dipped them in the can, then hung them to dry. Don't they look cute all hanging there? They ended up with a dried poly 'drip' on the bottom of each pawn, but since I'd be drilling another hole in the bottom anyways, I didn't worry about this so much.
Once all the pawns were painted, hooked and polyed, I drilled another small hole in the bottom of each pawn and added a small eye, which was set perpendicular to the hook.  And why did I do this? So that when the pawns were hanging they'd all face out! (see, I DO think ahead once and awhile!)
 And here's all sixty pawns all ready to be named:

I picked up a ready made plaque (yes, I cheated a little) and painted it in a kind of neutrally-wood-grain colour (so it would work with all decors) To make painting easier, I stuck four push-pins in the back side.
Using my brand-new Cricut (!!!) I cut out the text and the decals in black vinyl, applied them to the plaque, and polyurethaned it.


Some more drilling and adding of hooks and the whole thing is DONE! I'm thinking I have to make one for myself now :)


And because I'm such a dork, I also made a custom box for the whole shebang so it would look all pretty when unwrapped:


Is anyone wondering what the hubby made for this gift exchange? Sorry, I'm gonna show you anyways:
His minimalist, modern clock. TA DA!

Saturday, November 05, 2011

Kids on the walls

No, my children are not climbing the walls, but I'm sure that will happen soon enough.  Remember those pics I took back in July? The ones I showed you here ? Well, they're finally up on the wall.


I printed the photos at McBain's on canvas.  The gallery wraps are pretty expensive, so I just got the canvas, then put them in some frames without glass.  The effect is pretty nice:


I also did the kids' silhouettes.  I took a photo of their profiles, then edited in photoshop and printed to transfer to a canvas board. They were then mounted on a plaque spray painted gloss black.  REALLY like these, but they'll have to be updated every once and awhile just like photos.  I think I took the photo of Olivia when she was about 4 months old, and I can really see the difference!


(and no, Olivia's head is not defomed, she got that extra bump from my dad...we like to call it her extra brains!)

Wednesday, August 24, 2011

Pinspiration

So here's a couple Pintrest project I've done over the past week.  Although my boards are chock full of nifty ideas, most of them will probably never get done, but I had to try my hand at these:

Taking my inspiration from this beauty Ashton and I made this piece for his room.  He thought the process was pretty cool


If I would do it again though, I'd buy a pack of brand new Crayolas instead of raiding the crayon bin and using no-name crayons.  The wax was a little runny, almost greasy, so I let the wax cool a few times and then shot it with the blow dryer again.

I also attempted something just for DH, although Ashton kinda ate them all.  When I saw this link for microwave potato chips I just HAD to try them.  They turned out much better than expected, even though I forgot to PAM the plate the first time...this is the amount you get from one potato:


The only thing I'd do different next time (and I will be doing this again!) would be to pick up some sea salt to season with.  Regular table salt just didn't seem to cut it.

I also made some homemade laundry detergent and fabric softener, both of which I'm rather impressed with.  I added some essential oils (lavender) so I wouldn't miss the store bought scents too much, and the only difference I've noticed is that the clothes are less static-y then they were!  Will definitely be keeping this one up!


Friday, August 05, 2011

DIY decor using shims.

So my basement is slooooowly getting done.  DH is having problems convincing buddies to come and help install the floor - it's 2/3 of the way there.  As soon as that's done, we can start setting up since there's just trim and doors and bathroom stuff and closet stuff...okay there's a lot of stuff left after the floor, but you get the point.  I've seen some pretty cool stuff here in 'net land to decorate the basement with.  My Pintrest basement board is chock full of all sorts of DIY goodies.  Here's one I absolutely swooned over!

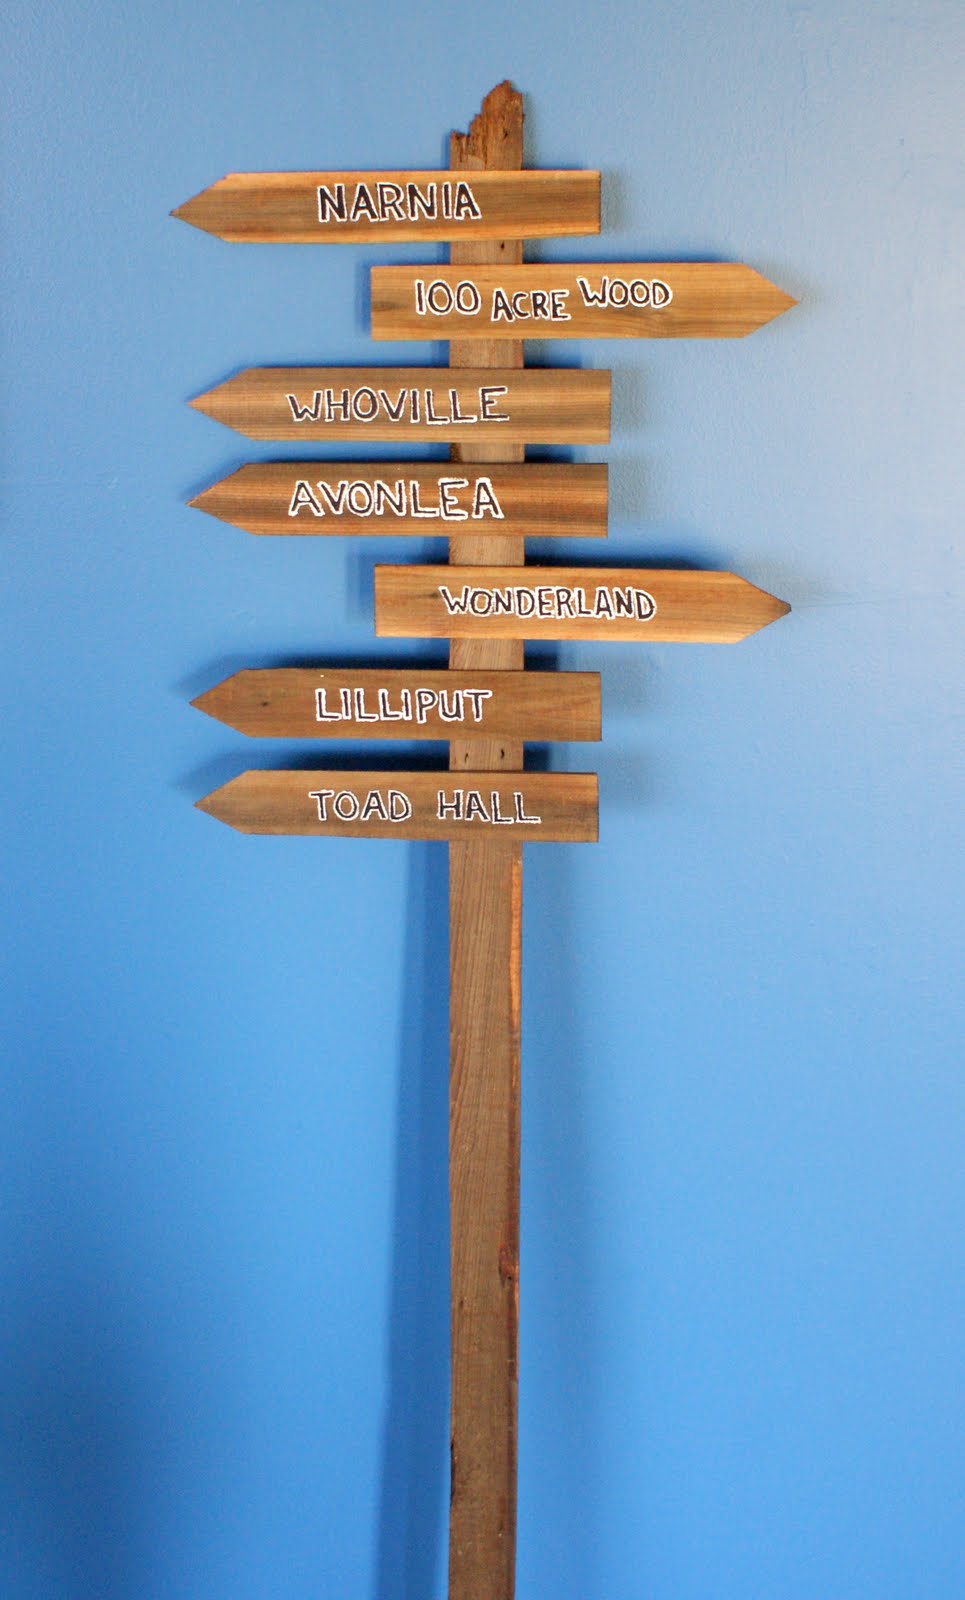
Perfect by a little reading corner!  So my little brain got to work: How can I make this without 1. going to buy lumber and transporting it home on top of the car seats and 2. Cut the lumber without wading over top of DH's mess in the garage.  The answer came as I was organizing the complete disaster downstairs: SHIMS!  (y'know, those little wedges used to make the jam level when installing a door - I think they're usually made of ceder)  There were two lovely packs sitting there waiting and waiting to be used, so I thought, why make them wait any longer?  So I went and grabbed the prettiest ones (some are a little cracked or knotty)  As stated before, although I can use power tools, I didn't feel like wading through the mess, so to create the points for the arrows I used a utility knife.  Just made a few cuts and voila beautifully pointy shims!  To 'antiquify' the wood I let some steel wool sit in white vinegar for a few hours, then brushed the mixture on the wood.  (wherever the bits of steel wool hit the wood, there ended up being little rusty speckles.  And I also antiqued my ugly laminate counter top in the process - reason #52 for a new kitchen...)


I had envisioned doing each sign in some lovely font which went with the story, but that never occurred.  Just painted some block letters on with black acrylic and outlined with white.


I chose locations in stories which I had read as a child (okay, who am I kidding, that I still read now) Mounted on a scrap piece of wood (also 'antiqued') with wood glue, I think it looks pretty good!

I also saw this sign from artsy fartsy mama that I thought would 'match' pretty well

So here's my version:

Shims lined up, one glued across the back holding it all together.  I decided not to 'antique' this one.  And how did I get the font?  Well I'm glad you asked!  After brainstorming quite a bit I thought of this really easy way to transfer images to a non-smooth surface.  All I did was print the text (backwards!) on a transparency.  With an ink jet printer the ink does not dry (make sure you're not using an 'inkjet transparency')  Flip the transparency ink side down, place on wood (no wiggling, you'll smudge it) and rub.  The ink should transfer so that you can go  over it with the paint colour of your choice!  Done and done.

My hubby's comment when he saw my 'creations' "How do you expect me to hang the doors if you keep using all the shims?"  Ha ha.


UPDATE: YES, I MISSPELLED ROALD DAHL'S NAME. IT'S FIXED NOW...OOPS!

Wednesday, May 18, 2011

A few past crafty things...

So at the moment I'm trying to paint the basement in the half hour cat naps O's been giving me.  While my crafting is on hold, I thought I'd give a peek at a few things I've done in the past.

  I sewed these Noah's ark animals for Christmas 2009 (?) It took a LOT of time, but was really fun to do!  I bought the pattern online from Three Score Ten (sorry, no link, can't find it back...)  So it was a multi-step process making these: first I sewed them all (most tedious part of the process) then I primed them with gesso twice, then painted all the underbellies white (with acrylic paint - NOT the craft stuff)  The fun part was painting them all!  I then used embroidery floss for the manes of the zebras and giraffes and all the tails, and some weird rope-ish wool for the beard, hair and the lion's mane. Lot's of fun, but of course Ashton was more interested in all the store bought toys he got that year...  Two years later I'm still waiting for DH to make a wooden ark to store them all.  When I stuffed the dove I put a magnet in it's bottom, so when he gets around to the ark I can set a magnet on the top of the ark so the dove can perch on top!

  REALLY easy craft that anyone can do - all this is is scrapbooking paper and foam letters from Dollarama.  I had this frame which wasn't being used (I keep a large collection of frames and change my photos out fairly often - people change over time you know!) and was kind of scratched from the last move, so I just scratched it up a little more.  It now hangs in Olivia's yet-to-be-used nursery (she finally sleeps well in the bassinet, so I'm keeping her in there as long as possible)  The nursery is blue and classic-Pooh themed (the book, not Disney)  I'll probably have a post about muraling a little later on...


  Ashton's room is truck/construction themed (gasp! Really?)  Not sure how long he'll be into it (although his obsession with wheels started at 6 months and shows no sign of stopping) so I didn't do any murals in his room, but painted this little grouping of canvases for him.  I just bought a cheapy set of pre-stretched/gessoed canvas at Michael's and used an overhead to sketch them on.  I really like creating my own artwork for the kids' room, saves me a lot of searching for stuff that matches...
  Speaking of matching, have you ever felt that overpowering frustration when searching for just the right night-light?  Well I sure have!  So I upcycled this old Ikea lamp (you've probably seen them, with the paper?)

 The paper was ripped, so I took it off, then glue-gunned the fabric onto the rings.  No need to be perfect in the length, because it stretches to fit!  It's a flannel, which isn't technically fireproof, but I only put a 25w in there, and it doesn't seem to get to warm.

Anywaysssss...wish me luck on the basement.  By my calculations it should take me about 3 years to paint the whole thing...