Showing posts with label sewing. Show all posts

Wednesday, July 11, 2012

Olivia's Easter outfit


Aren't I terrible? Here it is, July, and I'm just getting around to posting Olivia's Easter dress. Bad, bad, blogger!!

Anyways, I had been hording this pink, sheer, embroidered fabric. The dress is lined with pink broadcloth (I'm so cheap! That's my go-to crap) with a shirred empire waist and puffed sleeves.

I decided she needed a coat and hat too, so quickly whipped up a crocheted sunhat and swing coat. The coat is also in the pink broadcloth lined with a pink fleece. Little daisy chain accent and a few flower buttons, and we're ready to go!


She had fun 'walking' around with Grandma while the older kids were egg hunting!

Friday, June 22, 2012

Crochet yoke tops

My vow to make Olivia's complete summer wardrobe didn't stand completely, but I did manage to make her a bunch of fun tops.  After completing this beauty, I was hooked and made 2 more!


Comfy knit fabric


Butterfly applique


Stunned rabbit model


No idea why this picture keeps flipping.  Tilt your head please.

Okay, I guess I didn't take a picture of the 3rd top, and it's in the wash right now.  Oops.  It's another floral print with a pink crocheted yoke.  Hope you enjoy!!


Saturday, January 28, 2012

Tutu dress

Recently I was lucky enough to test the Madeline Tutu Jumper from Amy's AMAZING PeekaBoo Pattern Shop. 


What I love most about this pattern is it's versatility.  Different fabric and colour choices will give you a completely different feel to this little number.  I went with a funky cotton print, but can you imagine this in a deep, jewel-toned velvet? Or white eyelet with lace instead of the tulle? The possibilities are endless!!  The pattern called for a knotted strap, but since Olivia is still crawling, I decided to loop the straps and use a button.


Loving the fluffy little baby butt!


Monday, December 12, 2011

Thrifting finds

Every time we head to Lethbridge area to visit my sister-in-law and her family, we schedule some time in to go thrifting.  Not only is my sister-in-law reeeaaally good at it, the secondhand shops in Lethbridge are AMAZING! Check out our finds:

Hubby came with us, which was an unusual treat, and found this vintage brown leather coat:

When he asked my opinion, I told him he needed some pointy brown shoes to go with it, and he promptly found those too!

Of course, I can't go into any secondhand store without checking out the books. Here's the finds:

Lots of good stuff!

I also found a vintage Transformers bed sheet, which will be turned into something for the little man (pajamas?) and some gorgeous embroidered pink eyelet fabric.  Looking forward to sewing something summery and flowy for Olivia with that


I also picked up some doilies (project in the works, don't worry! I don't drape them over my furniture!) a plaid scarf and a vintage Creative Circle ornaments kit (my mom had these same ornaments!)


The plaid scarf was made into a kilt for Olivia:


and the ornaments were completed and hung on the tree:


I also picked up another sweater on a different thrifting trip and made another sweater dress (like this one, except with a split neck rather than a turtleneck)


Lots of fun! And there's something so satisfying about using thrifted materials to craft, isn't there?!!

Tuesday, November 29, 2011

Homemade Birthday Gifts

My sister's kids have their birthdays on the 22nd and 25th of December.  I know. Great timing. And I sort of started a tradition for myself of making their birthday gifts, since we usually buy their Christmas ones. And this year was no exception! For the big 6 (!) year old, I found this Geologist Kit idea on Pintrest. I sewed up a vest and freezer stencilled his name on the front and 'Jr. Geologist' on the back:


To go with the vest, Ashton and I put together a rock collection box for him:


and filled it with special rocks from Scholar's Choice, as well as a magnifying glass:


He has a rock collection already which he can add to this.  If I remember correctly, the rocks are (clockwise) assorted treasure rocks, an obsidian arrowhead, a geode which he can break open, agate, peacock ore, and pyrite (fool's gold) As you can see most of these came with little slips of paper describing them.  Educational AND fun!

For the 3 year old (who is singing happy birthday around the Christmas tree and trying to blow out the lights - poor girl!) I sewed up a dress using Burda #9740 and some funky Ikea fabric.  I've been hesitant to try out any of their fabric since it seems so heavy, but once washed it's like a lightweight denim.


And since no 3-year-old gets all that excited about clothes, I whipped up a little crocheted bunny to go with it (using this pattern)


I think I have more fun coming up with and making their gifts than they have receiving them!

Wednesday, November 09, 2011

Hand sewn felt doll

Yet ANOTHER idea from pintrest.  Found this link and I thought they were so gorgeous that I just had to make one.  I mean, don't they look simply amazing?


So I delved into my substantial stash of felt and got going!  I haven't hand sewed for awhile, but found it strangely rewarding...I could actually do other things at the same time!  Some things turned out a little wonky, but all in all I'm pretty pleased with it. Here's the pics:


She's so pretty - no name yet...Hmmmm

Friday, November 04, 2011

Cat in the Hat twirly skirt

Sewing and crafting supplies all over the place. Olivia eating stray threads. House is a mess (okay, that last one is pretty normal) What does this all mean? Christmas crafting has begun! It might seem a little early, but I usually start planning in September.  That doesn't mean I go shopping them, but I write down a list of who will be receiving gifts, and decide what to get them.  And this year, that means MAKE for them! Some of the gifts will be store bought, but I'm trying to make as many as possible this year...I even convinced my side of the family to do a handmade/secondhand/recycled/upcycled/regifted Chinese gift exchange (those choices should cover everyone, right?)

My niece and nephew have birthdays on the 22nd and 25th of December, so instead of exchanging gifts on Christmas Eve (that used to be our tradition) we have Sinterklaas. That's a dutch tradition where gifts are exchanged on the 5th (or, in our case, whichever Saturday is closer)  Did you know Sinterklaas was the original Santa Claus?

So, anyways, I'll have lots of fun sewing and crafting stuff to show you over the upcoming weeks!  To start with, here's a skirt I made for David's niece, who looooves the Cat in the Hat!


  She's almost 2, but apparently more like a size 3/4...whoa!  Since I don't know exactly what size she is, I did a kind of drawstring waist so it will fit her for a long time (it even fits Ashton, although he didn't want me to take a picture.  I wonder why?)


Friday, October 21, 2011

Upcycled Sweater Dress

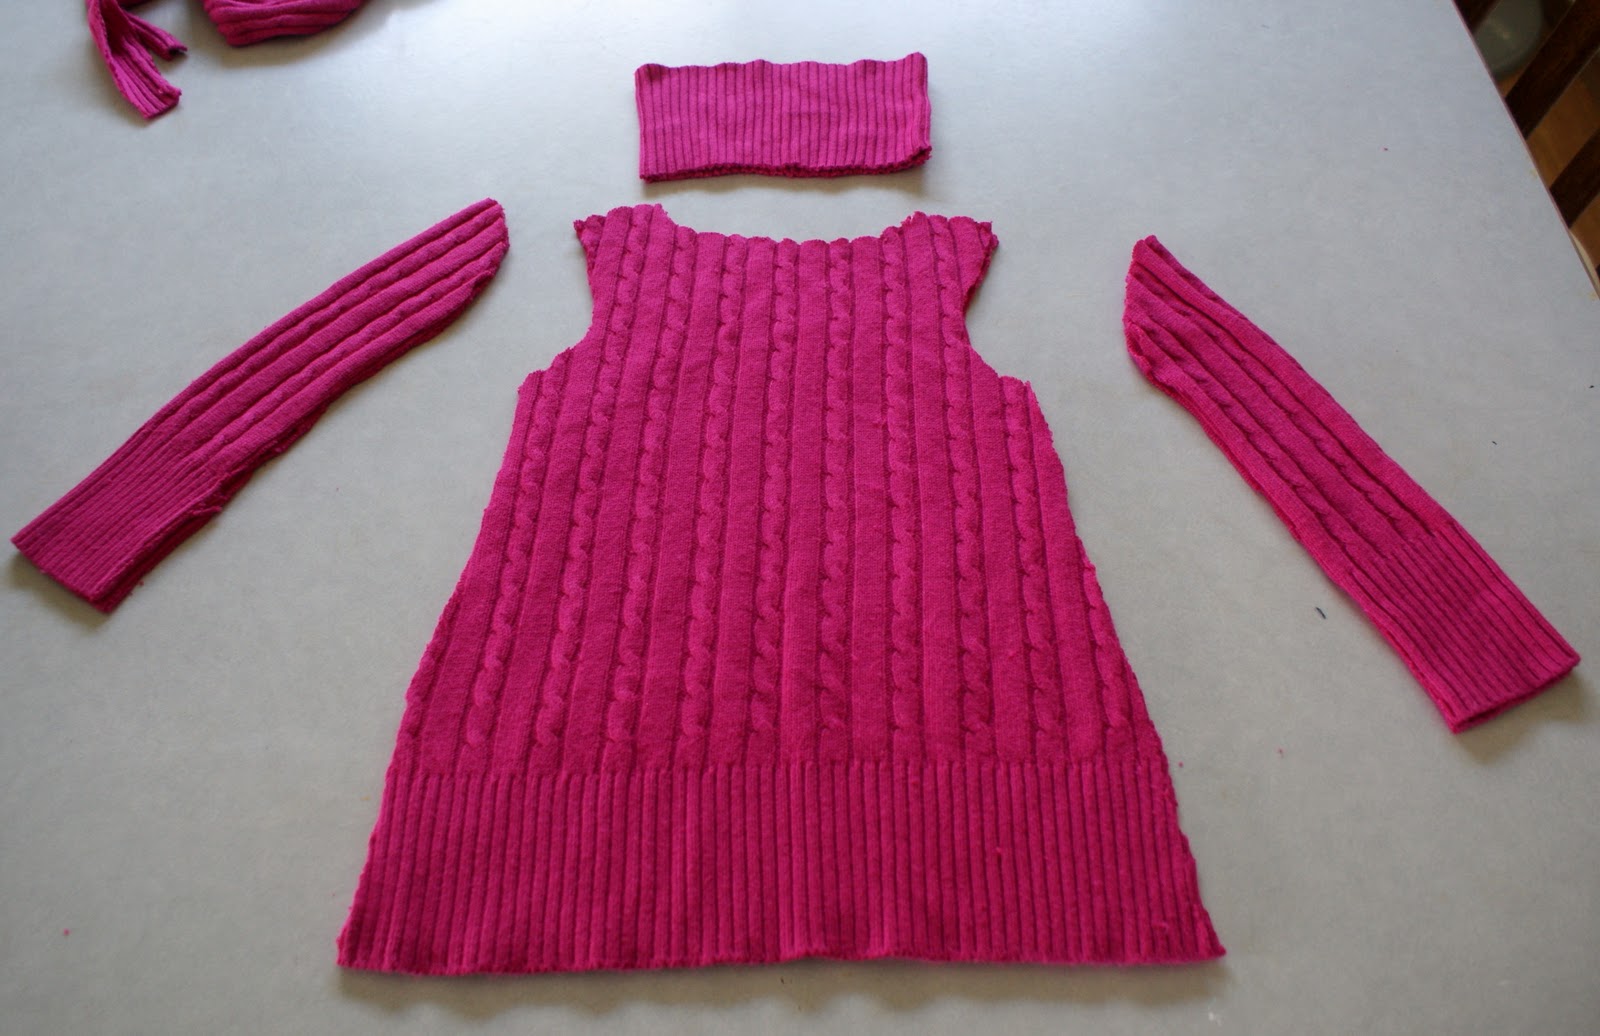
Really easy project which costs practically nothing! I visited the thrift store and picked up this ladies turtle neck:

Using a dress from Olivia's wardrobe as a template, I cut out the front, back, sleeves and neck.  I didn't add seam allowances since this knit is reeeeally stretchy:


With the wrong sides together, I sewed the shoulder seams:


Then pinned and sewed the neck:


Then pinned and sewed  the sleeves onto the dress:


Then sewed the sleeve seam down the underarm to the sides of the dress:


And TA DA! That's all there is to it!  I even picked up another thrifted sweater which is waiting in my huge project pile...such a comfy, pretty fall outfit!  Here's the little princess 'modeling' it.  Although it would be nice to get a better shot of the dress, I'm in no hurry for her to start running around!


Tuesday, August 16, 2011

Easy shirred bandana dress tutorial

A few posts ago I posted a bandana dress that I had made for Olivia here.  It turned out really cute and since it's so easy to make I thought I'd put together a tutorial for it.  This one will actually be a toddler top, but the only difference in the construction is how tight the shirring is.  Here we go!
First of all hit the dollar store and pick up two bandanas.  These were $1 each and are 100% cotton, so I prewashed them so they won't shrink afterwards.  I prewashed the previous ones as well, but on subsequent washings the colour bled a bit, so be warned!
Next, we're going to shir each bandana.  There's lot's of shirring tutorials out there, but here's what I do. 
Wind the bottom bobbin with elastic thread.  Don't stretch the thread tight as you wind it, but don't wind it loosely either.  Then place it in your bobbin holder.  I've used both a side and drop-in machine and they both seem to work fine.
Sew a few rows along the edge of the bandanas.  It can be kind of tricky to get the rows perfectly straight, so go ahead and mark it (I'm too cheap to buy a water soluable marking pen, so I just grab a piece of chalk off Ashton's easel!)  Less rows will make more of an empire waist line.  I decided on 5 for this one.  Don't worry about how gathered your lines are at this point. (left picture)
To gather your sirring simply pull the bottom bobin thread (the elastic) to your desired width.  Repeat with all the rows, making sure both front and back are roughly the same width (right picture)

So that the elastic ends don't slip after trimming and so that they don't stick out and tickle, I sew the front and back together using a french seam.  With a french seam you sew the sides firstly with the WRONG sides together, then turn and sew again with the RIGHT sides together.  Obviously your second seam will be a little wider so you don't see the ends of your first seam poking out.


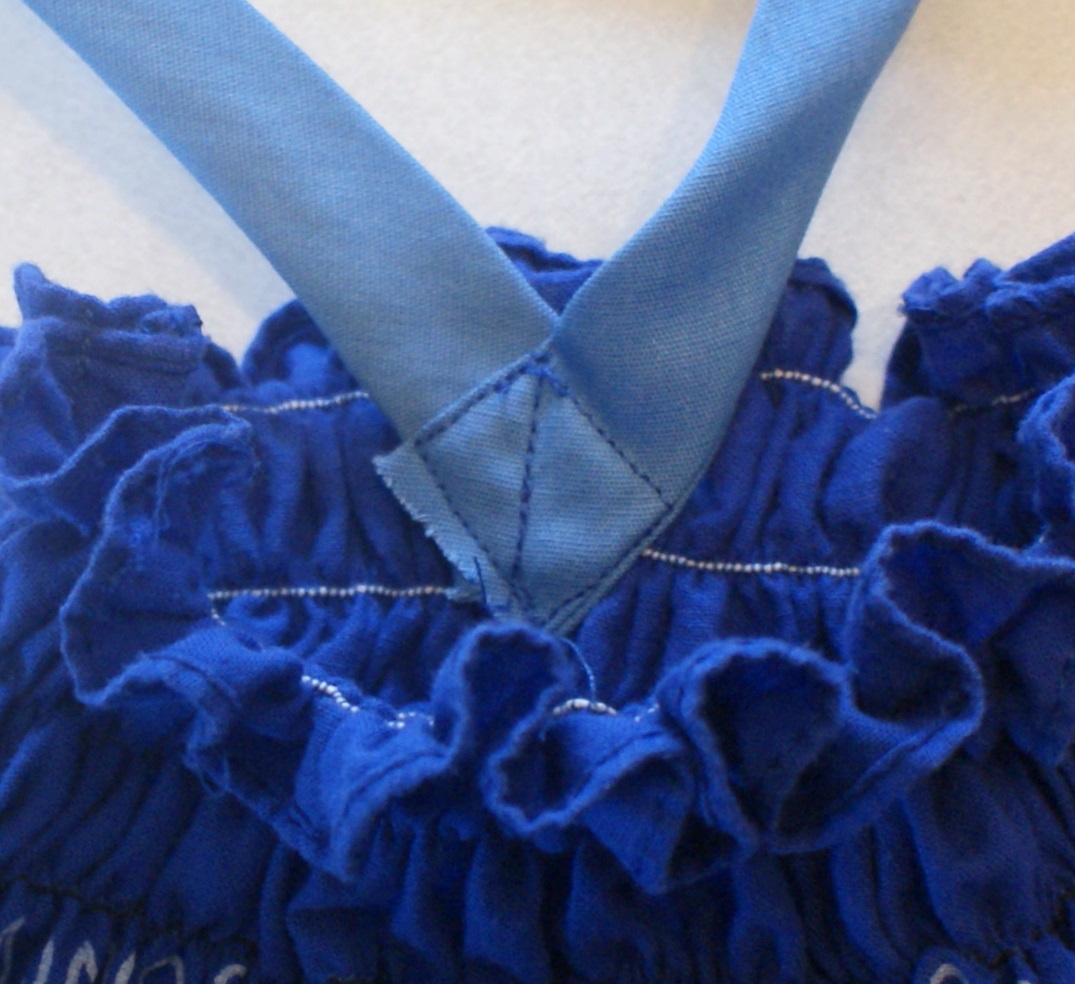
To make the halter tie sew two ribbons together at a right angle (left picture)  Or if you don't have any ribbon that matches your dress, grab some scrap fabric (or bias tape, or whatever works) and sew a small tube to flip right side out.  Then sew the right angle of your ribbon to the front of your dress.

And VOILA you're done!  Pretty easy, hey?


Feel free to ask me any questions you may have and I'll do my best to answer them!  Have fun!


Featured on Tip Junkie

Thursday, August 11, 2011

How to resize a tshirt (and my first go at freezer paper stencilling!)

K, so altering a tshirt may not be rocket science, but you never know.  I've had this idea for freezer paper stencilling for awhile, but since I don't have the shopping opportunities I used to it's kinda been on hold until I could pick up two red tshirts.  Plain red.  With nothing on them.  Like, no logos or anything.  Yup.  Harder than you thought isn't it?  Okay, it wasn't all that hard.  Zellers had them.  And on sale too!  At least they had Ashton's size (I got him a 6)  But try to find a plain red t or onesie in a 6m size, especially in August!  But I found a long-sleeved t which could be re sized for O (on sale too!) in a size 2.

So obviously the first thing to do is cut up the shirt.  Trace a tshirt that fits along the arm and side seam, remembering to add seam allowance (!)  If the neck of the new shirt isn't too much bigger, leave as is. (in my case it was fine.  If you do have to alter it...um...google it?) Cut along lines.  Trace the sleeves of the old shirt along the arm seam onto the sleeves of the new shirt.  In this case the hem of the sleeves were about the same size, so I definitely took advantage of that.

So you should end up with something like this:


I used a serger for this project (hence the white thread.  Too lazy to change it) but you could easily use a regular machine and zig zag the edges afterwards.  Open up your shirt, and sew the arm seams, but not the seam under the arm for now.  You might have to tweak the curve of the arm a bit, but this is knit, and knit is forgiving.  A little stretch, a little push, and a final steam with the iron and no one is the wiser, right?  Okay, yes.  I admit it.  I cheat a lot with sewing, but is anyone actually going to stop your kids and examine their clothes reeeally closely?  I should hope not.  Moving on.  Where were we?  I think here:
Now sew the underarm seam continuing to the side seam.  Ta Da.  For those of you still trying to 'set' your sleeves after sewing the side seams, STOP.  I serged the bottom of the shirt as well so I wouldn't have to roll the hem 'cause I'm lazy like that.

A quick switch to the regular machine for the hem (yes, I switched the thread) and DONE.

Okay, not quite done.  I still had to press it. (when ironing knits don't drag the iron across, just hold in place and steam. Not for too long obviously.  When you start seeing smoke, that's a sign you've pressed a little too long...) But I had good reason not to press this right away, since I was using this shirt for my first (bum ba da bum!)
FREEZER PAPER STENCIL
Yay! Lots of tutorials for that floating around blog land for these, so I won't give you a step by step for that, but I will show you the finished product.  Ahem, drum roll:

(see how pretty the hem is now?) I'm so proud of myself for pulling this off with the first try!  And Ashton looves them! (Olivia just wanted to eat it, go figure)  They weren't really in a posing mood, but I did get this shot of them:


Anyways, hope this was marginally helpful to somebody...

my crafty side is already filling up with more freezer paper stencil ideas...it's so easy and fun!