Obviously the person receiving the gift would want to choose whose birthday to remember, so I just made 'people' for the grandkids since they'd go on everyone's calendar anyways.
 To make the people, I picked up some game pawns from Windor Plywood. A lot of game pawns. My sister married into a huge family, and I wanted to make sure this gift could work for everyone. Unfortunately they were already painted, which made repainting them a bit more work since I had to do multiple coats.
 I started with painting all the heads flesh coloured. I then added the hair and features (half of the pawns are girls, and half boys, and I did half blonde and the others brown haired) The bodies were then painted red and blue. I drilled small holes in all the heads, and added small hooks (all facing left - I'll tell you why later ;)
  I added the hooks at this point to make it easier to coat them in polyurethane. Instead of painting them each individually, I dipped them in the can, then hung them to dry. Don't they look cute all hanging there? They ended up with a dried poly 'drip' on the bottom of each pawn, but since I'd be drilling another hole in the bottom anyways, I didn't worry about this so much.
  Once all the pawns were painted, hooked and polyed, I drilled another small hole in the bottom of each pawn and added a small eye, which was set perpendicular to the hook. And why did I do this? So that when the pawns were hanging they'd all face out! (see, I DO think ahead once and awhile!)
I picked up a ready made plaque (yes, I cheated a little) and painted it in a kind of neutrally-wood-grain colour (so it would work with all decors) To make painting easier, I stuck four push-pins in the back side.
Using my brand-new Cricut (!!!) I cut out the text and the decals in black vinyl, applied them to the plaque, and polyurethaned it.
Some more drilling and adding of hooks and the whole thing is DONE! I'm thinking I have to make one for myself now :)
And because I'm such a dork, I also made a custom box for the whole shebang so it would look all pretty when unwrapped:
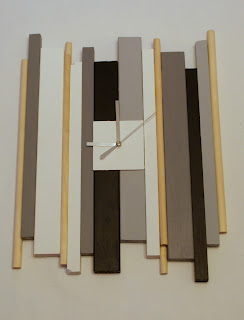
Is anyone wondering what the hubby made for this gift exchange? Sorry, I'm gonna show you anyways:
His minimalist, modern clock. TA DA!


Really cool Jess! Did you find that there are some months with lots of people (I have 4 on one day in our family!!!) and others with none? How does that look when its up on the wall??
ReplyDeleteGwen
Since it's a gift I don't really know, but most likely! I'd make sure you have plenty of wall space!
ReplyDeleteWow, that is so darn creative. I just love it! Adorable and functional. I am a new follower visiting from Young and Crafty. http://www.messforless.net/2011/12/easy-pipe-cleaner-activity.html
ReplyDeleteThat is so cool. What beautiful talents you both have! :)
ReplyDelete